Archive for the 'Uncategorized' Category

06
jul
16

How to install and configure Apache,PHP,MySql and phpMyadmin (LAMP) on ubuntu

Step 1:
Installing apache

To install apache on ubuntu, Open Terminal. To open terminal click the Dash home from unity launcher. And type terminal in the search field.And click Terminal .

terminal

And type the below code in terminal and hit enter.

sudo apt-get install apache2

Type your ubuntu password and press enter.

Type y and hit enter to confirm apache installation.

After the successful installation  , open your favorite browser and type

http://localhost/

in the address bar and press enter. If you will see ‘It works!’ in the Apache2 Ubuntu Default Page, then your apache works fine.
Apache2 Ubuntu Default Page: It works

Step 2:
Installing PHP

To install PHP on your ubuntu OS, Open Terminal. And type the below code in terminal and hit enter.

sudo apt-get install libapache2-mod-php

Type your ubuntu password if needed.

Type y and hit enter to confirm PHP installation. This will install PHP7 on ubuntu.
After the successful installation restart Apache using the below code

sudo /etc/init.d/apache2 restart

or use the below code to restart

sudo systemctl restart apache2

Install php 7 and php 5.6 in the same system:

You can also install php 5.6 and php 7 in the same system. To install php 5.6 along with php 7, you need to add ondrej php PPA.

To add this PPA. open your ubuntu terminal. And add the below code in terminal and press enter key.

sudo add-apt-repository ppa:ondrej/php

then type the below command

sudo apt-get update

Then type the below command in terminal and hit enter.

sudo apt-get install php5.6

If you want to install some other php extensions use the below code to install them.

sudo apt-get install php5.6-mysql php-gettext php5.6-mbstring php-xdebug libapache2-mod-php5.6 php5.6-cgi php5.6-cli php5.6-curl php5.6-gd php5.6-intl php-imagick php5.6-imap php5.6-mcrypt php-memcache php5.6-pspell php5.6-recode php5.6-sqlite3 php5.6-tidy php5.6-xmlrpc php5.6-xsl php-xcache php5.6-fpm

You can switch the PHP version easily with the below code.

To switch from php7.0 to php5.6:

Type the below command in terminal and press enter key

sudo a2dismod php7.0 ; sudo a2enmod php5.6 ; sudo service apache2 restart

then

sudo ln -sfn /usr/bin/php5.6 /etc/alternatives/php

To switch from php5.6 to php7.0:

Type the below command in terminal

sudo a2dismod php5.6 ; sudo a2enmod php7.0 ; sudo service apache2 restart
sudo ln -sfn /usr/bin/php7.0 /etc/alternatives/php

Test PHP installation

To test PHP is installed, Type below code and hit enter (only for php7)

sudo gedit /var/www/html/phpinfo.php

in the terminal and type your ubuntu password if needed. It will open the phpinfo.php file in gedit.Type below code in the phpinfo.php file, save and exit it .

<?php phpinfo() ?>

Now open your favorite browser and type http://localhost/phpinfo.php in the address bar and press enter. If you will see the below page , then your php works fine.
phpinfo

To check the installed PHP version in terminal, type the below command in terminal and hit enter.

php -v

php version check
Step 3:
Installing MySql

To install MySql on ubuntu, Open Terminal. And type the below code in terminal and hit enter.

sudo apt-get install mysql-server

Type your ubuntu password if needed.

Type y and hit enter to confirm MySql installation.
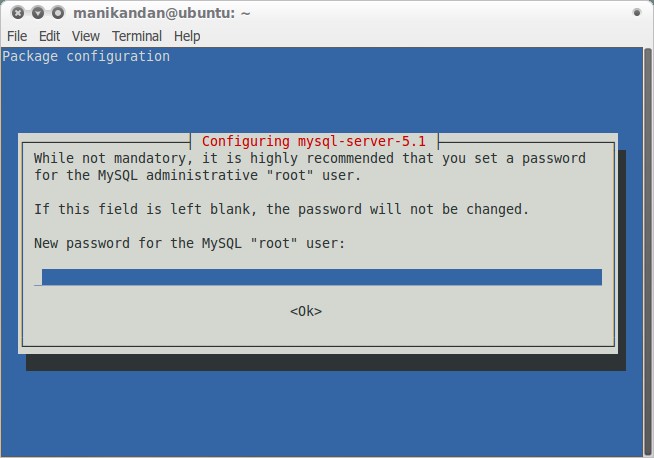
During the installation you will be prompted for a password.Choose something secure and type the password and hit enter .

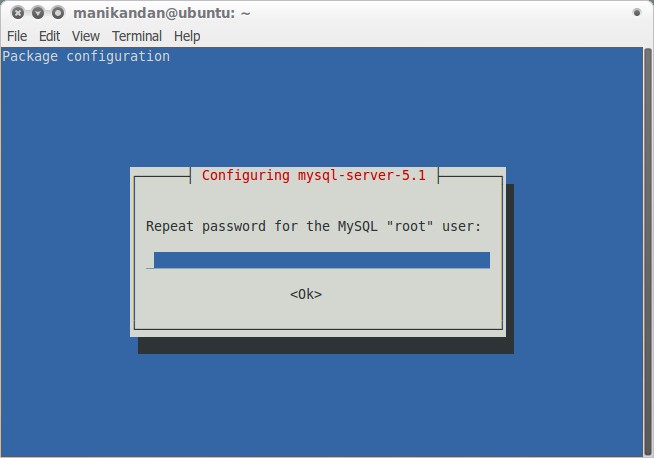
Repeat the password and press enter.

To install the mysql client, type the below command in terminal and press the enter key in your keyboard

sudo apt-get install mysql-client

To check the MySQL server status, use the below command

sudo systemctl status mysql

Install php mysql, php curl and php json modules:

To install php mysql, php curl and php json modules use the below command in terminal.

sudo apt-get install php7.0-mysql php7.0-curl php7.0-json

Step 4:
Installing phpMyadmin

phpMyAdmin is a free software tool written in PHP intended to handle the administration of MySQL over the World Wide Web.

Open Terminall. And type the below code in terminal and hit enter.

sudo apt-get install phpmyadmin

Type your ubuntu password if needed.

Type y and hit enter to confirm phpMyadmin installation.

During the installation you will be prompted for a configure database for phpmyadmin wjth dbconfig-common.

Select ‘Yes’ to configure database for phpmyadmin wjth dbconfig-common.

phpmyadmin config 1

Then Enter password of the database’s administrative user.

and select OK and press enter.

phpmyadmin config 2

Then enter your MySQL application password for phpmyadmin:

and select OK and press enter.

phpmyadmin config 3

During the installation you will be prompted for a webserver configuration. Select apache2

(already selected) press enter.

After the successful installation and configuration, restart apache using the below command.

sudo systemctl restart apache2

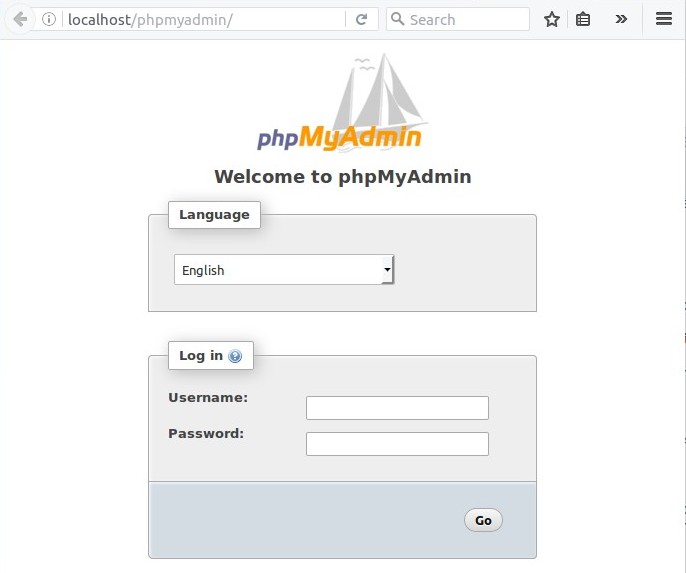
Then open your browser and type

http://localhost/phpmyadmin/

in the address bar and press enter. It will open the Phpmyadmin admin login page.

Type your username and password to login.

phpMyAdmin on ubuntu

In case phpMyAdmin is not working or you get an empty phpmyadmin page, then please do the following steps.

Open terminal, and type the below command :

sudo gedit /etc/apache2/apache2.conf

it will open the apache2.conf file in gedit with root permission.

Add the below line at the end of the file and  save and the exit it.

Include /etc/phpmyadmin/apache.conf

Restart apache service using the below command.

sudo systemctl restart apache2

Then type the below code in terminal.

sudo apt-get install php-mbstring php7.0-mbstring php-gettext

Then restart mysql using the below command.

sudo /etc/init.d/mysql restart

Then open your browser and type

http://localhost/phpmyadmin/

in the address bar and press enter. It will open the Phpmyadmin admin login page.

Type your username and password to login.

You’re now ready to start building your local website. just put all of your files into

/var/www/html/

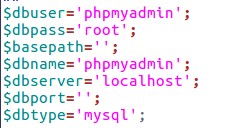
If you forget your username and password, just type the below command in terminal

sudo gedit /etc/phpmyadmin/config-db.php

Note down the username and password.

phpmyadmin username and password on ubunut

29
abr
15

Installing Wireshark on Ubuntu 14.04 LTS

Installing wireshark on Ubuntu 14.04 LTS and limiting packet capture to one group, in this case the group wireshark. I’m sure you can use these instructions for other debian based distributions.

Although you’ll have to take it as read that I’ve only tested it on Ubuntu, feel free to let me know if it doesn’t and I’ll amend the instructions to suit.

First, we install Wireshark from the terminal.

Installing Wireshark

sudo apt-get install wireshark

No interface can be used for capturing in this system with the current configuration

If you run wireshark as a non root user at this stage (see image above), you will get the message “No interface can be used for capturing in this system with the current configuration.”. The following steps will rectify this.

Create the wireshark group.

sudo groupadd wireshark

Add your username to the wireshark group

sudo usermod -a -G wireshark YOUR_USER_NAME

Change the group  ownership of file dumpcap to wireshark

sudo chgrp wireshark /usr/bin/dumpcap

Change the mode of the file dumpcap to allow execution by the group wireshark

sudo chmod 750 /usr/bin/dumpcap

Grant capabilities with setcap

sudo setcap cap_net_raw,cap_net_admin=eip /usr/bin/dumpcap

Verify the change

sudo getcap /usr/bin/dumpcap

At this point, you will need to log out, then back into Unity (Thanks for Jorge for pointing this out).

You should now be able to run Wireshark as a non-root user, just as long as that user is part on the wireshark group, everything should just work.

04
nov
14

SQL 2008/2008 R2/2012/2014 setup disappears/fails when installing Setup Support files

I’m sure many of you would have seen this issue when running SQL 2008/2008 R2/2012 setup on a new server. The setup will proceed to install Setup support files, the window will disappear but, strangely enough, the next window never shows up.

Here’s what you need to do:

  1. Click on start->run and type %temp% and press enter (basically, go to the temp folder)
  2. Here, look for SQLSetup.log and SQLSetup_1.log. Open the SQLSetup_1.log file. In there, check for the following messages:
    04/16/2012 17:16:47.950 Error: Failed to launch process
    04/16/2012 17:16:47.952 Error: Failed to launch local setup100.exe: 0x80070003

Typically, you get this error only in SQL 2008, SQL 2008 R2 and SQL 2012. The steps are slightly different for all 3, and I’ve tried to outline them here:

SQL Server 2008

  1. Save the following in a .reg file and merge to populate the registry:

Windows Registry Editor Version 5.00

[HKEY_LOCAL_MACHINE\SOFTWARE\Microsoft\Microsoft SQL Server\100\Bootstrap]
“BootstrapDir”=”C:\\Program Files\\Microsoft SQL Server\\100\\Setup Bootstrap\\”

[HKEY_LOCAL_MACHINE\SOFTWARE\Microsoft\Microsoft SQL Server\100\Bootstrap\Setup]
“PatchLevel”=”10.0.1600.22”

  1. Next, copy the following files and folders from the media to the specified destinations:
File/Folder in media Destination
X64/X86 (depending on what architecture you want to install) C:\Program Files\Microsoft SQL Server\100\Setup Bootstrap\Release
Setup.exe C:\Program Files\Microsoft SQL Server\100\Setup Bootstrap\Release
Setup.rll C:\Program Files\Microsoft SQL Server\100\Setup Bootstrap\Release\Resources\1033\

Next, re-run the setup, and it should proceed beyond the point of error this time.

SQL Server 2008 R2

  1. Save the following in a .reg file and merge to populate the registry:

    Windows Registry Editor Version 5.00

[HKEY_LOCAL_MACHINE\SOFTWARE\Microsoft\Microsoft SQL Server\100\Bootstrap]
“BootstrapDir”=”C:\\Program Files\\Microsoft SQL Server\\100\\Setup Bootstrap\\”

[HKEY_LOCAL_MACHINE\SOFTWARE\Microsoft\Microsoft SQL Server\100\Bootstrap\Setup]
“PatchLevel”=”10.50.1600.00”

  1. Next, copy the following files and folders from the media to the specified destinations:
File/Folder in media Destination
X64/X86 folder (depending on what architecture you want to install) C:\Program Files\Microsoft SQL Server\100\Setup Bootstrap\SQLServer2008R2
Setup.exe C:\Program Files\Microsoft SQL Server\100\Setup Bootstrap\SQLServer2008R2
Resources folder C:\Program Files\Microsoft SQL Server\100\Setup Bootstrap\SQLServer2008R2

Next, re-run the setup, and it should proceed beyond the point of error this time.

SQL Server 2012

  1. Save the following in a .reg file and merge to populate the registry:

    Windows Registry Editor Version 5.00

[HKEY_LOCAL_MACHINE\SOFTWARE\Microsoft\Microsoft SQL Server\110\Bootstrap]
“BootstrapDir”=”C:\\Program Files\\Microsoft SQL Server\\110\\Setup Bootstrap\\”

[HKEY_LOCAL_MACHINE\SOFTWARE\Microsoft\Microsoft SQL Server\110\Bootstrap\Setup]
“PatchLevel”=”11.00.2100.60”

  1. Next, copy the following files and folders from the media to the specified destinations:
File/Folder in media Destination
X64/X86 folder (depending on what architecture you want to install) C:\Program Files\Microsoft SQL Server\110\Setup Bootstrap\SQLServer2012
Setup.exe C:\Program Files\Microsoft SQL Server\110\Setup Bootstrap\SQLServer2012
Resources folder C:\Program Files\Microsoft SQL Server\110\Setup Bootstrap\SQLServer2012

Next, re-run the setup, and it should proceed beyond the point of error this time.

SQL Server 2014

  1. Save the following in a .reg file and merge to populate the registry:

    Windows Registry Editor Version 5.00

[HKEY_LOCAL_MACHINE\SOFTWARE\Microsoft\Microsoft SQL Server\110\Bootstrap]
“BootstrapDir”=”C:\\Program Files\\Microsoft SQL Server\\120\\Setup Bootstrap\\”

[HKEY_LOCAL_MACHINE\SOFTWARE\Microsoft\Microsoft SQL Server\120\Bootstrap\Setup]
“PatchLevel”=”12.00.2000.80”

  1. Next, copy the following files and folders from the media to the specified destinations:
File/Folder in media Destination
X64/X86 folder (depending on what architecture you want to install) C:\Program Files\Microsoft SQL Server\120\Setup Bootstrap\SQLServer2014
Setup.exe C:\Program Files\Microsoft SQL Server\120\Setup Bootstrap\SQLServer2014
Resources folder C:\Program Files\Microsoft SQL Server\120\Setup Bootstrap\SQLServer2014

Next, re-run the setup, and it should proceed beyond the point of error this time.

As always, comments/suggestions/feedback are welcome and solicited.

04
nov
14

Connectivity with MySQL

Connectivity with MySQL

For data interchange with MySQL there are two options one of which can be accessed in the connection wizards of SQL Server Integration Services assuming you have installed the programs. The other can be used to set up a ODBC DSN as described further down. The two connection options are:

In this article we will be using the ODBC connector for MySQL which can be downloaded from the MySQL Site. The connector will be used to create an ODBC DSN.

Transferring a table from SQL Server 2008 to MySQL

We will transfer a table in the TestNorthwind database on SQL Server 2008 (Enterprise & Evaluation) to MySQL server database. The MySQL database we are using is described in the article on Exporting data from MS Access 2003 to MySQL. In another article, MySQL Linked Server on SQL Server 2008, creating an ODBC DSN for MySQL was described. We will be using the DSN created in that article.

Creating an Integration Services project in Visual Studio 2008

Start the Visual Studio 2008 program from its shortcut. Click File | New | Project… to open the New Project window and select an integration services template from the business intelligence projects by providing a suitable name. The project folder will have a file called Package.dtsx which can be renamed with a custom name.

Add and configure an ADO.NET Source

The Project’s package designer will be open displaying the Control Flow tab. Drag and drop a Data Flow Task on to the control flow tabbed page. Click next on the Data Flow tab in the designer to display the Data Flow page. Read the instructions on this page. Drag and drop a ADO.NET Source from the Data Flow Sources items in the Toolbox.

It is assumed that you can set up a connection manager to the resident SQL Server 2008 on your machine. The next figure shows the configured connection manager to the SQL Server 2008. The table (PrincetonTemp) that will be transferred is in the TestNorthwind database. The authentication is Windows and a .NET provider is used to access the data. You may also test the connection by clicking the Test Connection button. If you are not sure of this you can review the free chapter from the book available here.

Beginners Guide to SQL Server Integration Services Using Visual Studio 2005

If the connection shown above is correctly configured, the test should indicate a successful connection. Right click the ADO.NET source and from the drop-down click Edit. The ADO.NET Source Editor gets displayed. As mentioned earlier you should be able to access the table and view objects on the database as shown in the next figure.

Beginners Guide to SQL Server Integration Services Using Visual Studio 2005

We have chosen to transfer a simple table, PrincetonTemp from the TestNorthwind database on SQL Server 2008. It has a only couple of columns as shown in the Columns page of the ADO.NET Source Editor.

Beginners Guide to SQL Server Integration Services Using Visual Studio 2005

The default for the Error page setting has been assumed, that is, if there is an error or truncation of data the task will fail.

Add an ADO.NET destination and port the data from the source

Drag and drop an ADO.NET destination item from under Data Flow Destinations items in the Toolbox on to the data flow page of the designer. There are two ways to arrange for the data to flow from source to the destination. The easy way is just drag the green dangling line from the source with your mouse and let go on the ADO.NET destination. A solid line will connect the source and the destination as shown.

Beginners Guide to SQL Server Integration Services Using Visual Studio 2005

(For more resources on Microsoft, see here.)

Configure a connection manager to connect to MySQL

In the Connection Manager’s pane under the Package designer right click to display a pop-up menu which allows you to make a new connection. When you agree to make a new ADO.NET Connection the Configure ADO.NET connection Manager’s window shows up and click on New… button on this page.

Beginners Guide to SQL Server Integration Services Using Visual Studio 2005

The connection manager’s page gets displayed as shown. In the Providers drop-down you will see a number of providers. There are the two providers that you can use, the ODBC through the connector and the MySQL Data Provider.

Beginners Guide to SQL Server Integration Services Using Visual Studio 2005

Click on the Odbc Data Provider. As mentioned previously we will be using the System DSN MySQL_Link created earlier for the other article shown in the drop-down list of available ODBC DSN’s.

Beginners Guide to SQL Server Integration Services Using Visual Studio 2005

Provide the USERID and Password; click the Test Connection button. If all the information is correct you should get a success message as shown.

Beginners Guide to SQL Server Integration Services Using Visual Studio 2005

Close out of the message as well as the Configure ADO.NET Connection Manager windows. Right click the ADO.NET Destination to display its editor window. In the drop-down for connection manager you should be able to pick the connection Manager you created in the previous step (MySQL_INK.root) as shown.

Beginners Guide to SQL Server Integration Services Using Visual Studio 2005

Click on the New… button to create a Table or View. You will get a warning message regarding not knowing the mapping to SSIS as shown.

Beginners Guide to SQL Server Integration Services Using Visual Studio 2005

Click OK. The create table window gets displayed as shown. Notice that the table is displaying all the columns from the table that the source is sending out.

Beginners Guide to SQL Server Integration Services Using Visual Studio 2005

If you were to click OK, you would get an error that the syntax is not correct as shown.

Beginners Guide to SQL Server Integration Services Using Visual Studio 2005

Modify the table as shown to change the destination table name (your choice) and the data type.

CREATE TABLE From2k8(
 "Id" INT,
 "Month" VARCHAR(10),
 "Temperature" DOUBLE PRECISION,
 "RecordHigh" DOUBLE PRECISION
)

Click OK. Again you get the same error regarding syntax not being correct. Modify the Create Table statement further as shown.

CREATE TABLE From2k8 (
 Id INT,
 Month VARCHAR(10),
 Temperature DOUBLE PRECISION,
 RecordHigh DOUBLE PRECISION
)

Click OK after the above modification. The table gets added to the ADO.NET Destination Manager Editor as shown.

Beginners Guide to SQL Server Integration Services Using Visual Studio 2005

Click on the Mappings on the left side of the ADO.NET Destination Editor. The column mappings page gets displayed as shown. We accept the default settings for Error Output page.

Beginners Guide to SQL Server Integration Services Using Visual Studio 2005

Click OK. Build the project and execute the package by right clicking the package and choosing Execute Package. The program runs and processes the package and ends up being unsuccessful with the error message in the Progress tab of the project as shown (only relevant message is shown here).

....
 .....
 [SSIS.Pipeline] Information: Execute phase is beginning.
 [ADO NET Destination 1 [165]] Error: An exception has occurred during data insertion, 
 the message returned from the provider is: ERROR [42000] [MySQL][ODBC 5.1 Driver]
 [mysqld-5.1.30-community]You have an error in your SQL syntax; check the manual that 
 corresponds to your MySQL server version for the right syntax to use near '"Id", 
 "Month", "Temperature", "RecordHigh") VALUES (1, 'Jan ', 4.000000000' at line 1
 [SSIS.Pipeline] Error: SSIS Error Code DTS_E_PROCESSINPUTFAILED. The ProcessInput 
 method on component "ADO NET Destination 1" (165) failed with error code 0xC020844B 
 while processing input "ADO NET Destination Input" (168). The identified component 
 returned an error from the ProcessInput method. The error is specific to the component,
 but the error is fatal and will cause the Data Flow task to stop running. There may 
 be error messages posted before this with more information about the failure.
 [SSIS.Pipeline] Information: Post Execute phase is beginning.
......
....
Task Data Flow Task failed
....

Start the MySQL Server and login to it. Run the following commands as shown in the next figure. By setting the mode to ‘ANSI’ makes the syntax more standard like as MySQL can cater to clients using other SQL modes. This is why the above error is returned although the syntax itself appears correct. In fact a create statement run on command line to create a table directly on MySQL could not create a table and returned an error when SSIS was used to create the same table.

Beginners Guide to SQL Server Integration Services Using Visual Studio 2005


After running the above statements, build the BI project and execute the package. This time the execution is will be successful and you can query the MySQL Server as in the following:

Beginners Guide to SQL Server Integration Services Using Visual Studio 2005

Summary

The article describes step by step transferring a table from SQL Server 2008 to MySQL using ODBC connectivity. For successful transfer the data type differences between SQL Server 2008 and the MySQL version must be properly taken into consideration as well as correctly setting the SQL_Mode property of MySQL Server.

30
jun
14

HowTo Install SQL Server 2008 R2

Here is the first of what I hope to be a regular part of The Code Attic experience,

a how-to article on something nice and geeky. As I continue to work on building
out my new machine I will document each of the steps I take in creating demos and
development environments.

Before you can develop or start showing demoes data a place to store and keep data
is needed. So after getting the OS up and running (Windows Server 2008 R2 of course)
you need a database. The following are the most straightforward 45 steps I used
to installing SQL Server 2008 R2 Developer addition with Reporting Services and
Analysis Services.

I won’t fully guarantee the steps will work for your setup but it does in mine,
at the very least is should provide some direction for you in your installation.

As always leave thoughts, questions, and tips in the comments.

Fun and luck I send your way.

Machine:

  • Windows Server 2008 R2 Standard x64 Windows
    Server 2008 R2 x64
  • Roles:
    • Active Directory Domain Services
    • IIS
    • Application Server
  • Running as virtual machine within VMWarePlayer 3.1.0 build-261024

Steps:

  1. Run the System Configuration Checker, resolve any issues that it detects
  2. Click Installation
  3. Click New Installation or add feature to an existing installation
  4. Enter Product key
  5. Accept license agreement
  6. Setup Support Rule
    • Windows Firewall Warning to resolve
      • The link which you are redirected to is : Configuring the Windows Firewall to All
        SQL Server Access ( 
        http://msdn.microsoft.com/en-us/library/cc646023(SQL.100).aspx
         )
        1. Assuming that if you are installing SQL Server you have an understanding of the
          purpose of a firewall I will not summarize the opening paragraphs.
        2. In case you were not aware, a default installation of Windows Server 2008 has the
          firewall on by default.
        3. You finally make it to useable information regarding the above error window about
          a third of the way down the article. The section is called “Ports Use By SQL Server.”
          They are kind enough to provide a table that explains each of the ports and there
          use.
        4. Default instances of SQL Server need TCP Port 1433 opened up. If you will have multiple
          named instances running on the machine additional port planning will need to take
          place, and is beyond the scope of this tutorial.
          • TCP port 1434
            • will need to be allowed if you plan to use Dedicated Admin Connections.
            • This feature is not enabled by default and so will not be covered in this tutorial
              as we are looking to build a basic machine with SQL Server 2008.
          • UDP port 1434
            • listens for any SQL Server Browser requests and provides the needed redirect to
              the appropriate TCP port for the named instance.
          • TCP port 443
            • is the default HTTPS port for SQL Server.
        5. Since we will also be installing Analysis Services the are additional ports to consider
          opening in the firewall will be
          • TCP port 2383
            • Standard port for a default Analysis Services installation
          • TCP Port 2382
            • Used only if a named instances of Analysis Services is being used.
          • TCP Port 80
            • If going to use Analysis Services via IIS (i.e. a connection is allowed to be established
              via a URL)
            • PivotTable requires HTTP or HTTPS
          • TCP Port 443
            • If planning to connect via HTTPS
        6. The final SQL piece our base image will have is Reporting Services
          • TCP Port 80
            • Allows for a HTTP (url) connection to be established
            • It is not recommended to use the default World Wide Web Services rule.
          • TCP Port 443
            • Allows for a HTTPS (secure url) connection to be established.
            • Again it is recommended not to use the default Secure World Wide Web Services rule.
        7. Open up the Windows Firewall and enable the abovementioned ports that relate to
          what you plan to install.
  7. You will be asked to enter your product key code, once entered click Next
  8. The Next step is to accept the Microsoft EULA. Feel free to take time to read it,
    I am sure there is many important things listed. Once you have read to your hearts
    content check the ‘I Accept..’ box, and if you wish to help out with the next version
    check the ‘Send feature usage…’ box.
  9. Click Next
  10. For this base image install SQL Server Feature Installation
  11. Click Next
  12. Feature Selection
    • Select the following
    • This feature set will require approximately 5752 MB
  13. Click Next
  14. The Installation Rules will run. There is a total of 24 rules it checks for. My
    system passed 6 of the rules while the remaining 18 were skipped (given a status
    of ‘Not Applicable’)
    • You will need to resolve any Fails before continuing. It is recommended that you
      correct warnings also.
  15. Click Next
  16. Instance Configuration screen
    • You will now be asked to either accept the default name instance or define a specific
      name for the SQL instance.
    • Since we are building out a fairly default machine for development purposes, select
      ‘Default Instance’
  17. Upon clicking Next you will be asked to review the disk space requirements
    for all the features you selected. If the listed drive does not provide enough space,
    then click Back and change the root directory under Instance Configuration.
  18. You will now be on the Server Configuration screen, where you will be required to
    enter the account which will run each service.
  19. Click Next
  20. The next step is the Database Engine Configuration. This step involves setting up
    the authentication mode and the SA account of the instance of SQL Server.
    • Authentication mode select Windows
    • Click Add Current User if you are currently logged in as an account you want to
      have SA privileges
  21. Click Next
  22. Analysis Services Configuration is the next step. This step is used to setup the
    administrators for Analysis Services.
    • Add all the users you wish to define with such a role.
    • Click Add Current User if the currently logged in user should be granted such permissions.
  23. Click Next
  24. Report Services Configuration is the last of the service configuration steps.
    • Select the top option “Install the native mode default configuration”
  25. Click Next
  26. If you would like to supply error reports to Microsoft check the box.
  27. Click Next
  28. Installation Configuration Rules will run. There is a total of 8 rules which will
    be checked.
    • My system resulted in 6 passed rules and 2 listed as Not Applicable
      • The NA rules are: Instance Name and SQL Server 2000 Analysis Services (64-bit) install
        action
  29. Upon clicking Next you will be given a summary of all the options
    and configurations settings chosen in the earlier steps.
  30. Click Install
  31. Everything has installed now it is time to perform some testing.
  32. The quick an dirty is to open up SQL Management Studio and create a database, if
    it creates you are in luck, it works.
  33. For Reporting Services, there are some additional steps.
  34. Try going to the report services link: http://<your
    server name>/Reports.
    • It will normally ask for credentials, at which time enter some credentials.
    • Most likely you will receive the following error message:
      • “SQL Server Reporting Services Error User <domain>\<name> does not have
        required permissions. Verify that sufficient permissions have been granted and Windows
        User Account Control (UAC) restrictions have been addressed.”
    • As you can guess, the user account must be given some permissions to get in.
  35. So you may be wondering how do I get around this issue and what caused it. My understanding
    is how Reporting Services handles the user accounts that are added during installation,
    see step 22.
  36. Even though you may already be logged in as the administrator for the system and
    SQL, you must run Internet Explorer as Administrator
  37. Re-enter the url for Report Server Manager (http://localhost/Reports)
    and you will be see the following
  38. Click Site Settings in the upper right hand corner. You are now
    in the site settings section of Report Server (if you are familiar with Windows
    SharePoint Server 3.0 you will notice some similarities in the setup of the screen.
    (Always nice of them to reuse good ideas.)
  39. On the left hand side click Security
  40. Click New Role Assignment this will take you to the page were new
    users can be added with different level of security (admin or user)
    • Here is a summary of the roles available, paraphrased from ‘User Predefined Role’
      at http://msdn.microsoft.com/en-us/library/ms157363.aspx.
    •  

      Role Description
      System Administrator A user has the ability to enable features and set defaults throughout the system.
      In addition, has the ability to set site-wide security, and define role definitions,
      along with manage all jobs.
      System User Only basic server information is viewable to this role group.
    • You need to add at least one user as a System Administrator so that you no longer
      have to run as administrator. For my set-up I will be adding both a system user
      and a system administrator user. This will allow me to have separation of control
      during demoes. I would recommend creating two new user groups on the machine which
      are assigned the appropriate role levels, and then adding the accounts to the groups.
      This will allow you to quickly make changes as new test accounts are created and
      used, along with getting you in the practice of thinking about security in terms
      of groups and not individuals.
    • In addition to setting the system roles you must setup roles for the actual folder/viewing
      level also. To do this return to Home, and click Folder Settings.
      • You will see a similar security setting page as before. Click New Role Assignment
    • As with before either groups or users can be assigned the different roles. Depending
      on you planned strategy it may make since to assign individual users at this level,
      but remember the more individuals you begin assigning, the more difficult administration
      tasks can become.
    • Here is a summary of the roles available, paraphrased from ‘User Predefined Role’
      at http://msdn.microsoft.com/en-us/library/ms157363.aspx.
      •  

        Role Description
        Content Manager All item level roles are wrapped into this single role. This means users or groups
        assigned the role are able to grant permissions, define folder structure, and all
        other management abilities of report server content.
        Publisher Grants the ability to add new items to the report server, including new reports
        and folders
        Browser Can run, subscribe, and browse reports. Can be considered a read only permission
        level.
        Report Builder Has the ability to author and edit reports which exist in the Report Builder
        My Reports Allows user to create a personal report workspace (think a SharePoint MySite like
        experience) were they can store and manager reports for personal use.
      • My recommendation is the user assigned the System Administration role at the site
        level should also be granted Content Manager role at this level. While your system
        user level group/user should be given at minimum Browser role, if not more. This
        is your call as to how you plan on using the system.
27
nov
13

Autorun Desabilitado

Iniciar > Executar > gpedit.msc

Configuração do computador > Modelos administrativos > Componentes do Windows > Diretivas de reprodução automática.

Colocar em DESABILITADO os items:
– Desativar reprodução automática
– Não configurar a caixa de seleção sempre fazer isto
– Desativar reprodução automática para dispositivos de não volume

Caso você queira, pode colocar em “não-habilitado” depois de novo, que vai funcionar igual.

05
set
13

Erro Windows Update 0x80190194 – Solução

1) Download this: http://go.microsoft.com/fwlink/?LinkID=91237

2) Unpack into c:\wua

3) From command prompt, type:

c:

cd\

cd wua

WindowsUpdateAgent30-x86.exe /wuforce


Follow the instructions and then retry to perform the updates.

05
set
13

Instalando o SQL SERVER 2008 R2

Muitos alunos perguntam sobre a instalação do Microsoft SQL Server 2008 R2, neste artigo iremos abordar a instalação do SQL Server 2008 R2, as diferenças de recursos entre as versões(2000, 2005, 2008, 2008 R2 e  2011 “Denali”), é um assunto que irei abordar em outros posts.

Espero que com esse tutorial você consiga instalar corretamente o SQL Server 2008 R2 e elucidar possíveis dúvidas.

Utilize os comentários para postar possíveis dificuldades, irei acompanhá-las e procurar respondê-las na medida do possível.

Versão x Edição

Em um primeiro momento, precisamos saber a diferença entre versão e edição. A definição de versão, é cada novo SQL Server lançado pela Microsoft. Inicialmente em parceria com a Sybase no final dos anos 80(1988), o SQL Server foi desenvolvido completamente pela Microsoft a partir de 1994, com a versão 6.0 codenome SQL95 e a versão 6.5 com o codenome Hydra.

Cada novo lançamento do SQL Server constitui-se uma nova versão, segue abaixo uma tabelinha que mostra a versão de cada um dos últimos softwares lançados.

7.0 1998 SQL Server 7.0 Sphinx
1999 SQL Server 7.0
OLAP Tools
Plato
8.0 2000 SQL Server 2000 Shiloh
8.0 2003 SQL Server 2000
64-bit Edition
Liberty
9.0 2005 SQL Server 2005 Yukon
10.0 2008 SQL Server 2008 Katmai
10.5 2010 SQL Server 2008 R2 Kilimanjaro (aka KJ)

Veja que embora o SQL Server seja comumente chamado de SQL Server 2000, 2005, 2008 e 2008 R2, esses são apenas nomes comerciais, se por exemplo você executar o código abaixo, você verá o número da versão do seu SQL Server instalado, e não seu nome comercial.

print @@version

Já edição, é o tipo de SQL Server encontrado em cada lançamento, por exemplo o Gol da VolksWagen possui várias versões, Gol Batedeira, Gol quadrado, Gol Bola, Gol Geração III, Geração IV e agora Geração V, mas em cada versão, existe as edições: Básica, duas portas, 1.0, 1.6, quatro portas ou seja em cada versão temos várias edições.

No SQL Server não é diferente, Edição e Versão vou entrar em detalhe em outro Post, mas o que você precisa saber por hora é que, as principais edições do SQL Server 2008 R2 são: Enterprise(Full), Standard(com limitações de recursos avançados para BI), Workgroup, Developer(igual ao Enterprise porém para desenvolvedores, custa em média R$ 189,00), Web, Express/Evaluation e Compact Edition.

Mas vamos ao que realmente interessa:

Instalando o SQL Server

Antes de instalar o SQL Server 2008 R2, é necessário instalar os pré-requisitos:

Após instalar os programas de pré-requisito, faça o download do SQL Server 2008 R2 Evaluation(Enterprise com 180 de prazo de expiração) ou coloque o dvd de instalação, e abra o arquivo setup.exe.

Verifique os pré-requisitos

Verificando os pré-requisitos

após todas as verificações serem concluídas, pressione Ok, e você escolherá qual edição do SQL Server 2008 R2 deseja instalar, as edições gratuitas são a Evaluation(que é uma edição completa, mas que expira em 180 dias) e a Express Edition(que possui algumas limitações, entre elas a do tamanho máximo de cada banco de dados criado, no SQL Server 2008 R2 essa limitação é de 10GB, também não possui recursos avançados para Análise de Dados).

Iremos escolher aqui a Evaluation.

Clique em Avançar. Após Ler os termos de licença, se concordar clique em Aceito os termos de licença.

Clique em Avançar. O Instalador do SQL Server 2008 R2 irá instalar arquivos de suporte para este processo, isso levará poucos minutos. Clique em Instalar.

Clique em Avançar.

Após algumas verificações clique em avançar

Após algumas verificações clique em avançar, será exibido a tela de Funções de Instalação, selecione a primeira opção, Intalação dos Recursos do SQL Server. Clique em Avançar.

Agora selecione quais recursos serão instalados no SQL Server, é importante lembrar que os recursos que você habilita ou não nesta tela, influencia diretamente algumas funções principais do SQL Server, como a Replicação por exemplo.

Portanto mencionarei quais os principais e dependendo do seu objetivo com SQL Server poderá habilitar outros.

Recursos Principais:

Serviços de Mecanismo de Banco de Dados(Database Engine)
Replicação do SQL Server(Replication)
Pesquisa de texto completo(Full-text search)

Observação:  Se for  trabalhar com BI(Business Inteligence), será necessário habilitar também Analysis Services e Reporting Services.

Habilite também:

Integration Services
Manuais Online do SQL Server (Books Online)
SQL Server Management Studio
F
erramentas de Gerenciamento  – Completas(Management Tools)

Os outros apenas em situações específicas que poderão ser habilitados também posteriormente, lembre-se que esse passo é muito importante, e que caso um recurso não esteja disponível, você poderá adicioná-lo futuramente por meio desta mesma tela, com a opção (Adicionar recursos à uma instalação já existente).

Seleção de Recursos

Após selecionar os itens para instalação, será avaliada as regras de instalação, para verificar se sua máquina está pronta para receber as configurações ora referidas. Pressione Avançar.

Na próxima tela, será configurado a Instância, cada instalação do SQL Server é uma nova instância, é interessante notar, que o SQL Server 2000 permitia apenas uma instância por máquina, mas a partir do SQL Server 2005, podemos ter múltiplas instâncias, ou várias instalações do SQL Server na mesma máquina, cada instância possui seu próprio serviço(Serviço é um programa que roda enquanto você usa a máquina, a idéia é que o serviço rode sem que o usuário final interfira, isso se chama back-end, é como um maquinista de um trem, sabemos que ele está lá, mas não precisamos interagir diretamente com ele, embora precisemos que ele esteja trabalhando bem), e deve possuir um nome.

A Instância padrão chama-se MSSQLSERVER, isso é uma instância default, suponha que você queira instalar o SQL Server mais uma vez na mesma máquina, será outra instância, mas esta segunda será uma instância nomeada(Named Instance) poderá possuir qualquer nome, menos o já usado na instância default, ou em outras instâncias que já foram instaladas.

Obs:Nomes de time de futebol como instâncias não são permitidos, uma exceção será apenas se for o do Corinthians ou Timão!

Clique em avançar.

Selecionando todas as opções, será necessário quase 5GB de espaço livre, com a instalação mínima, será necessário 1.7GB. Clique avançar.

Agora será especificado as contas do Windows em que os serviços principais irão rodar:

Serviços que sempre existirão:

  • SQL Server Database Engine
  • SQL Server Agent
  • SQL Server Integration Services
  • SQL Server Browser(Navegador do SQL Server)

outros opções.

  • SQL Server Analysis Services
  • SQL Server Reporting Services

É importante lembrar que a conta do windows que você selecionar deve pertencer ao grupo Administrator do Windows.

Na aba ao lado Collation(Agrupamento) determinamos se o SQL Server será:

CI / CS – Case Insensitive  / Case Sensitive

AI / AS – Accent Insensitive / Accent Sensitive

WI / WS – Width Insensitive / Width Sensitive

KI / KS – Kanatype Insensitive / Kanatype Sensitive

continua…

14
ago
13

Instalar e Configurar No-IP no Ubuntu

Install no-ip client from source on Ubuntu 9.10


Go to your home directory:

sudo cd ~

Download no-ip client:

Untar it:

tar xzf noip-duc-linux.tar.gz

Change directory to directory in which it was untared (my version is 2.1.9, so your folder may differ):

cd no-ip-2.1.9

Make:

sudo make

If the command above gives you some errors as you might not have GCC installed, you can install it by running first:

sudo apt-get install gcc

Make install:

sudo make install

It will ask you some question about the configuration of the client:

To start the program:

sudo /usr/local/bin/noip2

If we want to make it run every system start-up, we need to make a script:

sudo nano /etc/init.d/noip2

We enter the following:

#! /bin/sh
sudo /usr/local/bin/noip2

We exit the editor and make it executable:

sudo chmod +x /etc/init.d/noip2

Now we add it to system start-up:

sudo update-rc.d noip2 defaults

Useful command lines for no-ip client:

/usr/local/bin/noip2 -C                 configure a client
/usr/local/bin/noip2                    run a client
/usr/local/bin/noip2 -S                 display info about running clients
/usr/local/bin/noip2 -D pid             toggle the debug state for client pid
/usr/local/bin/noip2 -K pid             terminate client pid

All the commands available for noip client:

USAGE: noip2 [ -C [ -F][ -Y][ -U #min]][ -c file]
[ -d][ -D pid][ -i addr][ -S][ -M][ -h]

Version Linux-2.x.x
Options: -C               create configuration data
-F               force NAT off
-Y               select all hosts/groups
-U minutes       set update interval
-c config_file   use alternate data path
-d               increase debug verbosity
-D processID     toggle debug flag for PID
-i IPaddress     use supplied address
-I interface     use supplied interface
-S               show configuration data
-M               permit multiple instances
-K processID     terminate instance PID
-h               help (this text)

If you want to see if no-ip client is actually working, enter this in terminal:

sudo /usr/local/bin/noip2 -S

It should say 1 noip2 process active like this:

1 noip2 process active.

Process 1257, started as noip2, (version 2.1.9)
Using configuration from /usr/local/etc/no-ip2.conf
Last IP Address set 123.123.123.123
Account email@gmail.com
configured for:
host  domain.myftp.org
Updating every 30 minutes via /dev/eth0 with NAT enabled.

and the Last IP Address set should be your Ip adress, Account should be your email which you used when you have set up no-ip client, configured for: should be your no-ip.com subdomain you’ve choosen.

14
ago
13

Instalar e configurar PPPoE no Ubuntu

Introdução

 Para isso é necessário instalar e configurar o pacote PPPoE e editar alguns arquivos de configuração do GNU/Linux. Este tutorial tem o objetivo de ensinar de forma simples e eficaz como instar e configurar o pacote PPPoE e os arquivos resolv.conf, interfaces e rc.local.

Instalação do PPPoE

sudo apt-get install pppoe pppoeconf

Configuração do PPPoE (pppoeconf)

O Ubuntu 9.04 nas versões desktop e servidor vem com o pacote pppoeconf já instalado, bastando configurá-lo. Esse pacote serve para estabelecer a conexão entre sua máquina e o modem. Para isso precisamos configurá-lo realizando dez simples passos:

1° passo:

Estando no shell como super usuário (root), digite o comando:

# pppoeconf

Quando você digitar esse comando no shell ele abrirá uma tela como esta:

Linux: Configurar servidor PPPoE (Ubuntu)

Estando na tela acima, basta clicar em “Sim” e então será encontrada a interface que está conectada ao modem. É sempre bom colocar o modem na interface eth0.

Obs.: Este tutorial foi feito considerando que você utiliza o modem na placa de rede eth0 e que sua placa de rede que vai liberar o sinal da internet é a eth1.

2° passo:

Após clicado no “Sim” aparecerá outra tela dizendo que será modificado um arquivo de configuração do Linux, este arquivo é o dsl-provider. Apenas aceite clicando em “Sim”. Esta é a tela:

Linux: Configurar servidor PPPoE (Ubuntu)

3° passo:

Aparecerá mais uma tela dizendo que vai fazer um configuração padrão “popular”, basta clicar em “Sim”:

Linux: Configurar servidor PPPoE (Ubuntu)

4° passo:

Muita atenção nessa hora, pois agora faremos a parte mais importante da configuração. A tela que aparecerá a seguir servirá para informarmos qual é o nosso nome de usuário de acesso à internet. Exemplo: 3335221010@telemar.com.br. Este é apenas um exemplo ;-), você deve colocar o nome real do seu nome de usuário de acesso. Esta é a tela:

Linux: Configurar servidor PPPoE (Ubuntu)

Digite o seu nome de usuário de conexão e pressione “enter”.

5° passo:

Agora forneceremos a senha de acesso ao provedor. Exemplo: 3335221010

Linux: Configurar servidor PPPoE (Ubuntu)

6° passo:

Clicar em “Sim” nesta tela onde ele informa que utilizará os DNS disponíveis no arquivo resolv.conf para resolver os endereços que pega, por exemplo: a string http://www.google.com.br e transformar no seu correspondente endereço ip: 64.233.169.103:

Linux: Configurar servidor PPPoE (Ubuntu)

7° passo:

Nesta tela ele irá comentar sobre os protocolos padrões de transferência de pacotes, basta clicar em “Sim”. Esta é a tela:

Linux: Configurar servidor PPPoE (Ubuntu)

8° passo:

Nesta etapa vem a parte onde você irá especificar se a conexão será feita automaticamente quando o sistema for iniciado ou se você irá realizar a conexão manualmente. Por padrão clicaremos em “Sim”, ou seja, estamos dizendo que desejamos que a conexão seja estabelecida automaticamente. Esta é a tela:

Linux: Configurar servidor PPPoE (Ubuntu)

9° passo:

Informaremos que desejamos realizar a conexão agora, para isso basta clicar em “Sim”. Esta é a tela:

Linux: Configurar servidor PPPoE (Ubuntu)

10° passo:

Se tudo der certo aparecerá uma tela dizendo que a conexão foi estabelecida, basta clicar em “Ok”. Esta é a tela:

Linux: Configurar servidor PPPoE (Ubuntu)

Pronto, seu servidor já estabelece a conexão com a internet, então resolvemos esta parte.


Comentários

Categorias